java.lang.UnsupportedClassVersionError

All the versions of JDK come bundled up with the JRE (Java Runtime Environment). This way, a user doesn’t have to download and install JRE on their PC separately.

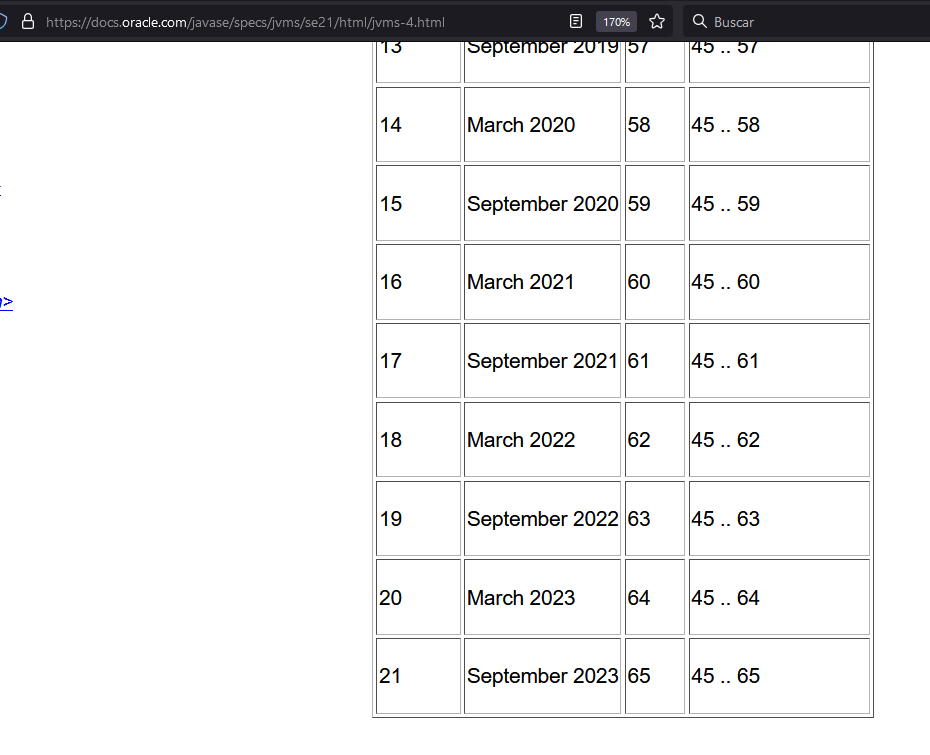
https://docs.oracle.com/javase/specs/jvms/se21/html/jvms-4.html

check the major version for your JAVA code (the java class file)

65 is the major version , correspond to JAVA-21

you HAVE TO READ RUNNING.TXT , located in tomcat/

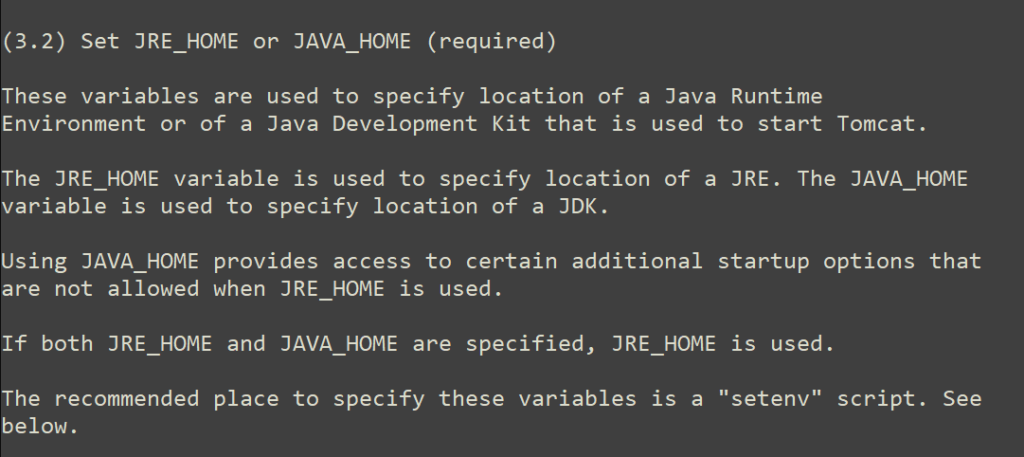
JRE_HOME or JAVA_HOME , required , not both , so simple solution , just delete JRE_HOME , altough some servlet tutorials (almost all) lead you to set up both .

if you find is neccesary set up both of them , this is the proccess , at final i give you some advices if nothing of these works ….

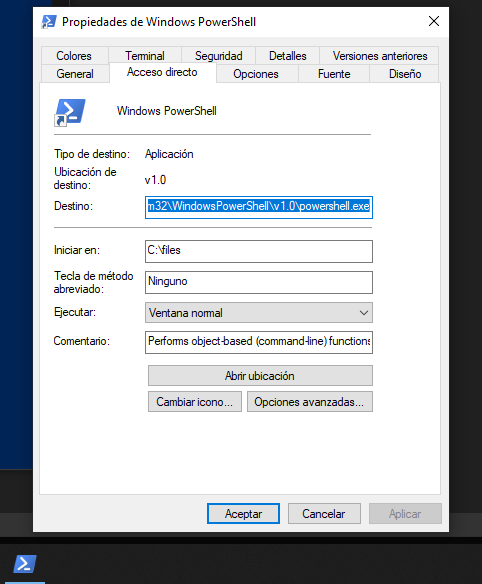
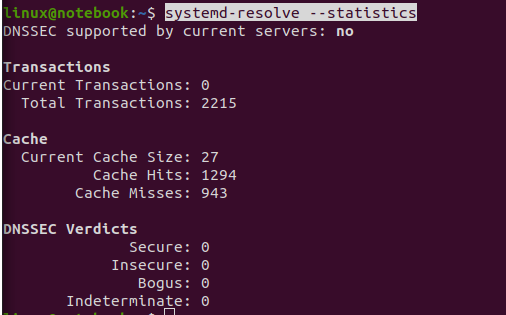
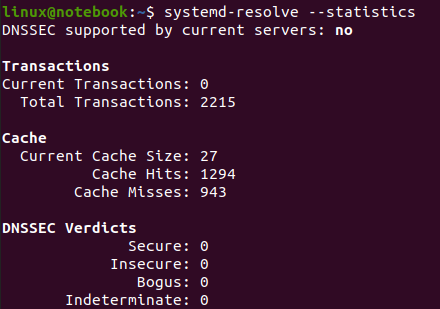
check our environments variables , this is the reason of our problem

we can comprobe just looking in our apachetomcat initialization

to solve you should JAVA_HOME == JRE_HOME , i mean have to be the same both jdk-21

JRE_HOME= xxx.yyyy.zzzz/jdk-21

check the current Java version load by server in in manager/html

admi user admin password is not the default one , have to config in tomcat-users.xml

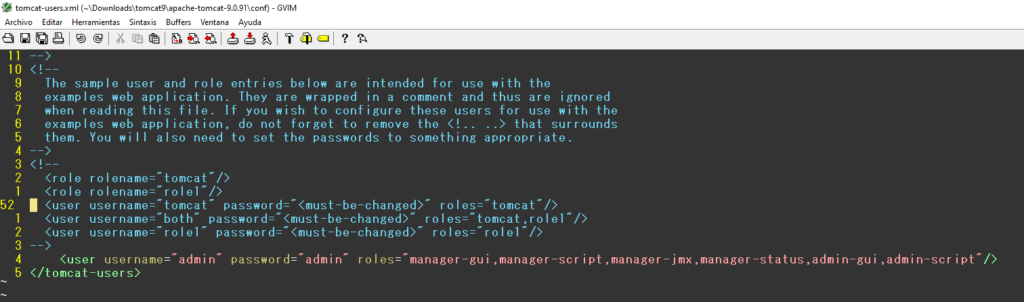
  <user username="admin" password="admin" roles="manager-gui,manager-script,manager-jmx,manager-status,admin-gui,admin-script"/>

now , launch again tomcat server

install apache tomcat as a SERVICE is not the same that execute by startup.bat , just for test purpose you unistall the service one , and download a zip one , then launch it using startup.bat located at bin folder , indeed you can use both , just need to change the ports , but i suggest you foor test purpose unistall one of them

GIT BASH error windows

E117: Unknown function: plug#end
Press ENTER or type command to continue

have to identify your executed VIM

which vim # in unix , git , show wich vim is currently using in git bash enviroment

where vim windows , cmd , show you all vim you have

executes vim on git bash is different from the vim installed on windows , then in git you have to (if dont have) manually your «.vimrc» follow these two steps : cd ~ vim .vimrc

now , you wont get this error again , in the above showed case , there was a problem with «plugin-vim» then you have to follow the installation on the github repository , unix option

:set showmatch
"set nu
"THIS DISABLE SENSITIVE CASE IN SEARCH
set ignorecase
"TO SET UP RELATIVE NUMER AND ABOSIULUTE NUMBE , HYBRID
set relativenumber number
"set number
" nnoremap is used to remapn a combuination key to another 

nnoremap <C-J> <C-W><C-J>
nnoremap <C-K> <C-W><C-K>
nnoremap <C-L> <C-W><C-L>
nnoremap <C-H> <C-W><C-H>

"VIM ENTRENATION
" DIsable arrows to force use hjkl keys 

noremap <Up> <NOP>
noremap <Down> <NOP>
noremap <Left> <NOP>
noremap <Right> <NOP>


call plug#begin()
Plug 'mattn/emmet-vim'
"Plug 'tmhedberg/SimplyFold'
Plug 'tpope/vim-surround'
"Plug 'artur-shaik/vim-javacomplete2'
call plug#end()


"TO CHANGE FROM RELATIVE NUMBER TO ABSOLUTE NUMBER 
nnoremap <F5> :set relativenumber!<CR>
"nnoremap <F6> :set number!<CR>


"edit emme-vim contro-y
let g:user_emmet_leader_key=','
" make indet to fold lines
set foldmethod=indent
" all fold lines (99)will be show when open the file 
set foldlevel=99
"Enalble folding with the spacebar
"nnoremap <space> za
let mapleader = ' '
nnoremap <leader><Space> :w<CR>


colorscheme desert

set guifont=@MS_Gothic:h14:b:cANSI:qDRAFT
"CONFIGURATION FOR PYTHON DEVELOPING
"This will give you the standard four spaces when you hit tab, ensure your line length doesn’t go beyond 80 characters, and store the file in a Unix format so you don’t get a bunch of conversion issues when checking into GitHub and/or sharing with other users.

"au BufNewFile,BufRead *.py
"      set tabstop=4
"      set softtabstop=4
"      set shiftwidth=4
"      set textwidth=79
"      set expandtab
"      set autoindent
"      set fileformat=unix
"
"
"au BufRead,BufNewFile *.py,*.pyw,*.c,*.h match BadWhitespace /\s\+$/

my current vim config , basically for html develoment

JAVA eclipse different ways implement INTERFACE


interface MyInterface {
	void sayHello();
}

class ClassOne {
	static void methodThatCallInterfaceMethod(MyInterface i) {
		i.sayHello();
	}
}

class ClassTwo implements MyInterface {
	static void sayGoodBye() {
		System.out.println("hi - for METHOD REFERENCE CALLING");
	};

         @Override
	public void sayHello() {
		// TODO Auto-generated method stub
		System.out.println("Good Morning FROM CASS THAT DIRECTLY IMPLEMENTS INTERFACE ");
	}

	MyInterface getMyInterface() {
		return this;
	}
}

class ClassThree {
	static ClassTwo getInstanceOfClassTwo() {
 		return new ClassTwo();
	}
}

public class Main implements MyInterface {
	public static void main(String[] args) {
		Main InstanceOfMain = new Main();
		//METHOD 1
		InstanceOfMain.methodThatServeAsABridgeToExecuteinMainStaticMethod();
		//METHOD 2
		ClassOne.methodThatCallInterfaceMethod(new Main());
		//METHOD 3
		ClassOne.methodThatCallInterfaceMethod(new MyInterface() {
			@Override
			public void sayHello() {
				// TODO Auto-generated method stub
				System.out.println("Good morning from INNER CLASS");
			}
		});
		//METHOD 4
		ClassOne.methodThatCallInterfaceMethod(() -> System.out.println("Hi from LAMBDA IMPLEMENTATION"));
		//METHOD 5
		ClassOne.methodThatCallInterfaceMethod(ClassTwo::sayGoodBye);
		ClassTwo InstanceClassTwo = new ClassTwo();
		//METHOD 6
		ClassOne.methodThatCallInterfaceMethod(InstanceClassTwo);
		//METHOD 7
		ClassOne.methodThatCallInterfaceMethod(InstanceClassTwo.getMyInterface());
		//METHOD 8
		ClassOne.methodThatCallInterfaceMethod(ClassThree.getInstanceOfClassTwo());
		MyInterface instanceCreatedToStoreAnnonymousInnerClass = new MyInterface() {

			@Override
			public void sayHello() {
				// TODO Auto-generated method stub
				System.out.println("hi from ANNONYMOUS INNER CLAS ASIGNED TO VARIABLE");
			}

		};
		ClassOne.methodThatCallInterfaceMethod(instanceCreatedToStoreAnnonymousInnerClass);
		ClassOne.methodThatCallInterfaceMethod(()->InstanceOfMain.methodInsideMainClass());
		
	}
	void methodInsideMainClass () {
		System.out.println("hi from CLASS INSIDE MAIN CLASS");
	};

	void methodThatServeAsABridgeToExecuteinMainStaticMethod() {
		ClassOne.methodThatCallInterfaceMethod(this);
	}

	@Override
	public void sayHello() {
		// TODO Auto-generated method stub
		System.out.println("hi from Main INSIDE CLASS");
	}
}

Oracle SQL Developer

SQL Developer help enter a substitution variable

«Insert into CSE_DEPT.COURSE (COURSE_ID,COURSE,CREDIT,CLASSROOM,SCHEDULE,ENROLLMENT,FACULTY_ID) values (‘CSE-334′,’Elec. Measurement & Design’,3,’TC-212′,’T-H: 11:00-12:25 PM’,25,’H99118′);»
In SQL , » &» is interpreted as the beginning of a substitution variable .

3 possible solutions :

SET ESPACE ‘\’ , and use ‘\’ to scape & in you code exp: \&
SET SCAN OFF , disable scanning for substitution variables

SET DEFINE OFF; turn off substitution completely

launch VIM from Command Prompt windows 10

after instal vim , there is a problem to launch vim from command prompt

we have to add a path to our user variables , first have to find folder where is our vim executable …

go to «environment variables»

edit «path» in user variables , ADD the folder where is you vim executable (there many other paths inside )

Determine current DNS resolver service

to flush/clean DNS , have to know your DNS resolver service

cat /etc/resolv.conf

«systemd-resolve» and «systemd-resolved» ARE NOT THE SAME

«systemd-resolve» is a command line tool for interacting with the «systemd-resolved» service and «systemd-resolved» is the actual DNS resolver service

now you can see DNS cache information , you can use this command «systemd-resolve –statistics»

sudo systemd-resolve –flush-caches

sudo systemctl restart systemd-resolved

these two commands fusl complety DNS cache ,

after run two commands above

Cisco Packet Tracer 8.2 (64 bit)

Download resource

https://www.netacad.com/portal/resources/packet-tracer

cd Downloads

sudo dpkg -i filename.deb

#run following command if there is some error during installation

sudo apt –fix-broken install

#to fix some error during installation about dependencies , run following

sudo apt install -f

to launch the packet or simply run it in programms (superkey+a )

packettracer

https://www.solvetechnow.com/post/cisco-packet-tracer-installation-on-ubuntu

for first time launch app , (skill for all option , green option )require login , «back» and then redirect to a browser tab , note that there are options below «login with google or cisco» , choose login with «cisco» and use «cisco» already ( for download its been required ) registered account …